
If you’ve gotten the basics in How What Where to Compost Part 1, below are tips on how to compost in a bin vs. a pile. “Bin” in this context means an enclosed plastic bin.
It can be as simple as a trashcan with holes drilled in it…

Or a more expensive stationary bin that may be open on the bottom, allowing bacteria, worms and other goodies to help the compost accelerate…


Or it may be one that can rotate in place…


Click the images for more info. Bin-wise, I’ve only used a trashcan with holes drilled in it, so I don’t have experience with the other items. I thought they’d be fun to share to get ideas flowing if you’re bin-curious. And here are some more types.
PLASTIC BINS

- EQUALITY: Put in an equal amount of “green” and “brown.” It doesn’t have to be at the same time, but within a few days of adding food scraps or green, add brown.
- ADD BROWN: Be sure to put in “brown” stuff. Only adding food, without carbon-rich dry brown items, makes the bin too nitrogen-rich, which is stinky and doesn’t make the chemical reaction that creates compost.
- WATER: Also, while water is usually added to compost, it’s sometimes possible for enclosed bins to use the moisture of the green ingredients to help cook the compost. But if things get too dry, try gently adding in some water when you turn the bin.
- MORE INFO: If you need more info, read How What Where to Compost
HOW DO YOU TURN THE BIN?
- NOT TOO HEAVY: Make sure it doesn’t get too heavy to turn. Turning the bin gives the compost the oxygen it needs to work.
- ROLLING IT AWKWARDLY IS FINE: When we were using a plastic trashcan with drilled holes, we’d slightly tip it and “steer” it, rolling it along the drive-way at an angle to rotate the contents inside.
- TARP OPTION: If the type of bin you have is stationary or isn’t rollable, an option is to dump out the compost onto a tarp, turn it and then put it back in the bin.
- MOVE-IT OPTION: If your bin is open to the ground at its base, some people pick up the whole bin off the compost, put it down in a new spot, then return the compost.
- PITCHFORK OPTION: You can also use a pitchfork to repeatedly push into the pile and lift it straight up. This is hard for me to do.
- MIXING TOOL OPTION: Some people use a handy compost mixing tool, designed only for turning stationary compost bins! Stick the bottom in and twist the handle to aerate the pile. People say they work wonders. Click to read their good reviews:


OPEN-AIR PILES
- 1 CUBIC YARD: One cubic yard is the magic size for the pile to really heat up.
- OUR EXPERIENCE: The following tips are how we make a pile at The Hollywood Orchard:
LAYERING
- BROWN + GREEN + WATER: Make a layer of green, about an inch thick, then a layer of brown, same thickness, then mix, gently water the layers the whole time you’re mixing, repeat until done.
- MIX EACH LAYER: To reiterate, instead of mixing it all at the end, we mix each layer. Doing it slowly lets it be thoroughly mixed which helps it cook. It’s physically more manageable to me too.
- HOW TO MIX: We use a pitch-forky hoe. (I’m sure that’s the proper name.)
WATERING
- GLUE: Watering while mixing lets the moisture go deep into the layer to hold it together like glue. This lets the pile get really tall and reach a cubic yard.
- NO MOISTURE, NO HEAT: Without watering each layer, it apparently doesn’t cook!
- SPONGE GOAL: The pile should be saturated to where you could wring the compost out like a sponge. But if water is trickling down the sides, it’s too much.
HOW TO FLIP/ TURN
- Next to the pile, have a second space as large as the one that holds the pile.
- Shovel the top layer onto the empty spot and repeat the same watering/ mixing for each layer like before.
- The top layer will become the bottom layer and the bottom becomes the top.
- The top layer will have cooked the least because it was exposed to the air.
- The inside will be more cooked, even ashy sometimes, or still steaming!
- So flipping allows the whole thing a chance to cook evenly.
- More new green or brown can be added every time a pile is flipped.
- At the end, cover everything in a layer of brown to reduce smells.
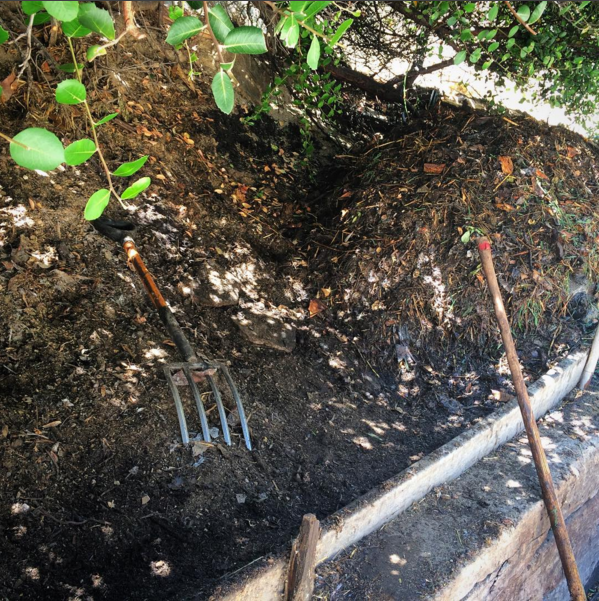
- For a visual, in the photo above, we moved the pile from the left space, where the pitchfork is, to the right.
- (I thought we would flip the pile in place, which seemed hard, messy and confusing. Putting it next to where it was, made it so easy to flip! That may seem obvious, but living in apartments for most of my life has apparently made my brain not think of space as an option. Having a 2nd spot blew my mind!)
- If you don’t have an extra plot to flip the pile, some people dump out the compost onto a tarp, turn it and then put it back in its original spot. Or you can try the pitchfork or mixing tool options above.
HOW OFTEN
- Turning or flipping a pile can be done once a week.
- Turning it every 3 weeks or whenever is fine too, it’ll just take longer for the pile to be “finished.”
- A pile can be turned as often as every three days to finish the project more quickly.
- Whether it’s every 3 days, once a week, or however long, turn the pile 3-4 times for it to become “done.”
INGREDIENT TIPS
- Horse poo really has a hard time breaking down. (Another gardening friend recently said that chicken poo or sheep poo work wonders! And cow poo, too, because their four stomachs break the food down more than a horse’s stomach.)
- We still use horse poo though.
- If we see something that is stuck in a clump, we break it up with our hands.
- The Hollywood Orchard doesn’t worry about avocado pits or too many acidic fruits. Our philosophy so far is that it’ll all break down eventually.
- Remember to chop up whatever large things go in the pile, food, twigs, etc., to help it “digest” more quickly. What does large mean? A whole orange is better halved or quartered, a branch is better in 3 inch pieces or at least smaller than it started.
- We usually use sheers to chop the ingredients. Whatever container holds the ingredients beforehand, a bucket, a trashcan, or whatever, we stick the sheers in and just chop around crazy until it feels like the right size. Or until we’re too tired to keep chopping.
PILES IN WOODEN BINS
This option is sort of a mix of the other two. It’s like an open-air pile in an enclosure. I don’t have experience with this, but will soon! We’re currently making one. I’ll update as we learn more. Below are some examples (click images for info). Here are more.


EVERYONE DOES IT DIFFERENTLY
Would love to hear how you do it.

For general composting info, check out How What Where to Compost.
Need inspiration? Maybe this will fluff your muffins: Why to Compost
My favorite context for the word “bin” (at 4:10): Life in Quarantine After 55 Days
Compost by faisalovers from the Noun Project
