If you’ve gotten the basics in How What Where to Compost Part 1, below are tips on how to compost in a bin vs. a pile. “Bin” in this context means an enclosed plastic bin.
It can be as simple as a trashcan with holes drilled in it…
Or a more expensive stationary bin that may be open on the bottom, allowing bacteria, worms and other goodies to help the compost accelerate…
Or it may be one that can rotate in place…
Click the images for more info. Bin-wise, I’ve only used a trashcan with holes drilled in it, so I don’t have experience with the other items. I thought they’d be fun to share to get ideas flowing if you’re bin-curious. And here are some more types.
PLASTIC BINS
EQUALITY: Put in an equal amount of “green” and “brown.” It doesn’t have to be at the same time, but within a few days of adding food scraps or green, add brown.
ADD BROWN: Be sure to put in “brown” stuff. Only adding food, without carbon-rich dry brown items, makes the bin too nitrogen-rich, which is stinky and doesn’t make the chemical reaction that creates compost.
WATER: Also, while water is usually added to compost, it’s sometimes possible for enclosed bins to use the moisture of the green ingredients to help cook the compost. But if things get too dry, try gently adding in some water when you turn the bin.
NOT TOO HEAVY: Make sure it doesn’t get too heavy to turn. Turning the bin gives the compost the oxygen it needs to work.
ROLLING IT AWKWARDLY IS FINE: When we were using a plastic trashcan with drilled holes, we’d slightly tip it and “steer” it, rolling it along the drive-way at an angle to rotate the contents inside.
TARP OPTION: If the type of bin you have is stationary or isn’t rollable, an option is to dump out the compost onto a tarp, turn it and then put it back in the bin.
MOVE-IT OPTION: If your bin is open to the ground at its base, some people pick up the whole bin off the compost, put it down in a new spot, then return the compost.
PITCHFORK OPTION: You can also use a pitchfork to repeatedly push into the pile and lift it straight up. This is hard for me to do.
MIXING TOOL OPTION: Some people use a handy compost mixing tool, designed only for turning stationary compost bins! Stick the bottom in and twist the handle to aerate the pile. People say they work wonders. Click to read their good reviews:
OPEN-AIR PILES
1 CUBIC YARD: One cubic yard is the magic size for the pile to really heat up.
BROWN + GREEN + WATER: Make a layer of green, about an inch thick, then a layer of brown, same thickness, then mix, gently water the layers the whole time you’re mixing, repeat until done.
MIX EACH LAYER: To reiterate, instead of mixing it all at the end, we mix each layer. Doing it slowly lets it be thoroughly mixed which helps it cook. It’s physically more manageable to me too.
HOW TO MIX: We use a pitch-forky hoe. (I’m sure that’s the proper name.)
WATERING
GLUE: Watering while mixing lets the moisture go deep into the layer to hold it together like glue. This lets the pile get really tall and reach a cubic yard.
NO MOISTURE, NO HEAT: Without watering each layer, it apparently doesn’t cook!
SPONGE GOAL: The pile should be saturated to where you could wring the compost out like a sponge. But if water is trickling down the sides, it’s too much.
HOW TO FLIP/ TURN
Next to the pile, have a second space as large as the one that holds the pile.
Shovel the top layer onto the empty spot and repeat the same watering/ mixing for each layer like before.
The top layer will become the bottom layer and the bottom becomes the top.
The top layer will have cooked the least because it was exposed to the air.
The inside will be more cooked, even ashy sometimes, or still steaming!
So flipping allows the whole thing a chance to cook evenly.
More new green or brown can be added every time a pile is flipped.
At the end, cover everything in a layer of brown to reduce smells.
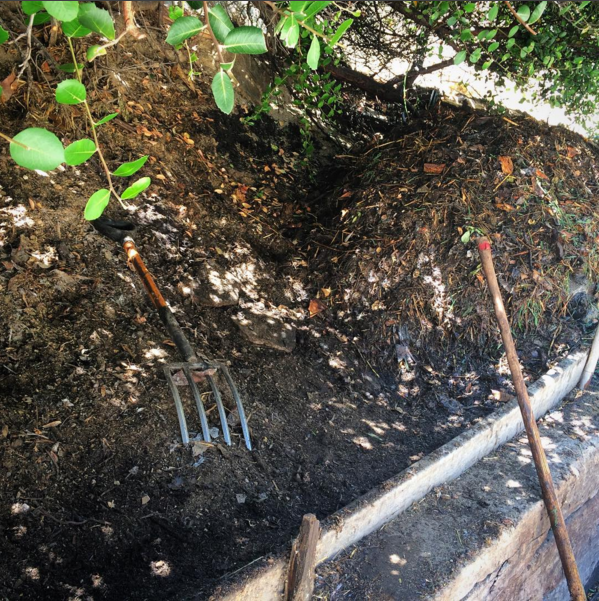
For a visual, in the photo above, we moved the pile from the left space, where the pitchfork is, to the right.
(I thought we would flip the pile in place, which seemed hard, messy and confusing. Putting it next to where it was, made it so easy to flip! That may seem obvious, but living in apartments for most of my life has apparently made my brain not think of space as an option. Having a 2nd spot blew my mind!)
If you don’t have an extra plot to flip the pile, some people dump out the compost onto a tarp, turn it and then put it back in its original spot. Or you can try the pitchfork or mixing tool options above.
HOW OFTEN
Turning or flipping a pile can be done once a week.
Turning it every 3 weeks or whenever is fine too, it’ll just take longer for the pile to be “finished.”
A pile can be turned as often as every three days to finish the project more quickly.
Whether it’s every 3 days, once a week, or however long, turn the pile 3-4 times for it to become “done.”
INGREDIENT TIPS
Horse poo really has a hard time breaking down. (Another gardening friend recently said that chicken poo or sheep poo work wonders! And cow poo, too, because their four stomachs break the food down more than a horse’s stomach.)
We still use horse poo though.
If we see something that is stuck in a clump, we break it up with our hands.
The Hollywood Orchard doesn’t worry about avocado pits or too many acidic fruits. Our philosophy so far is that it’ll all break down eventually.
Remember to chop up whatever large things go in the pile, food, twigs, etc., to help it “digest” more quickly. What does large mean? A whole orange is better halved or quartered, a branch is better in 3 inch pieces or at least smaller than it started.
We usually use sheers to chop the ingredients. Whatever container holds the ingredients beforehand, a bucket, a trashcan, or whatever, we stick the sheers in and just chop around crazy until it feels like the right size. Or until we’re too tired to keep chopping.
PILES IN WOODEN BINS
This option is sort of a mix of the other two. It’s like an open-air pile in an enclosure. I don’t have experience with this, but will soon! We’re currently making one. I’ll update as we learn more. Below are some examples (click images for info). Here are more.
These guidelines are true for any compost, whether it’s done in a bin, in a pile, or in the ground. (More info: Compost Bins vs. Piles)
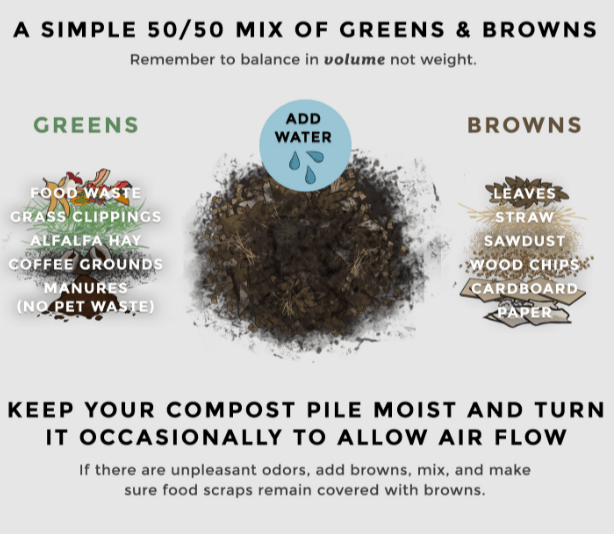
Compost needs about 50% green ingredients, 50% brown ingredients, oxygen and water.
GREEN
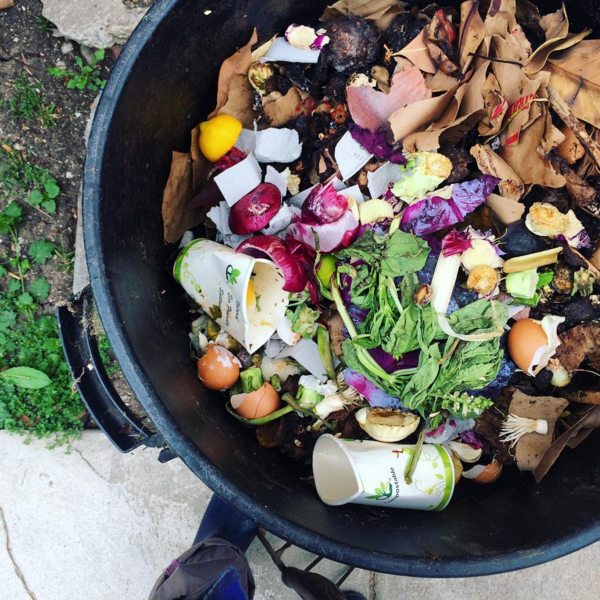
“Green” is anything with moisture. It can be any color. Food scraps, grass, leaves, coffee grounds, (non-pet) manure…
Green is nitrogen-rich.
If there is too much green, it will get very stinky. If this is happening, add more brown. (Also, too much green means too much nitrogen, which means it could burn plants if it was used as fertilizer in this stinky form.)
BROWN
“Brown” is anything dry. Dry leaves, brown paper bags, wood chips, egg cartons…
Brown is carbon-rich.
It helps to cover the compost with a layer of only brown to keep the smell enclosed.
OXYGEN
The compost needs oxygen to work. That’s why it’s important to turn bins or flip piles when making compost, to let oxygen reach different parts of the compost. Also, make sure there is air circulating around the compost.
WATER
The compost needs moisture, so add water to give it more oxygen and help it cook.
MORE INFO
No: No meat, dairy, fish, or animal food oils can go in the compost, unless it’s bokashi (More info: Compost Indoors or Meat & Dairy = BOKASHI). No pet waste because sometimes it has bacteria that can survive the heat of the pile.
Shrinkage: Whatever size the compost starts out, it will end up being much smaller when it’s done. (Sort of like cooking fresh spinach)
Organic: If you’re trying to make organic compost, make sure yard trimmings you use (fresh grass, brown leaves, etc) come from a yard that doesn’t use pesticides. Anything that is non-organic, we still compost in our city’s green bin.
Chop it: We chop up twigs and branches with shears before adding them to the compost. Making everything into smaller pieces helps the compost digest more quickly and easily, like chewing for our tummies.
IT COOKS INTO CLEANLINESS
A few years ago, a farmer friend of mine taught me that compost piles get hot and they are actually cooking the carbon-rich brown & nitrogen-rich green scraps. They get so hot, about 140 degrees, that the creatures one might worry about staying inside the pile (bad bacteria, bugs and any rodents who might smell tasty treats inside the pile) can’t live there anymore. It’s too hot so they leave. Pretty cool, huh? (Pun inaccurate and not intended.)
When a pile is flipped, sometimes there is ash inside. A pile covered in winter snow will still cook and sometimes steam will still rise off of the covering snow! The Hollywood Orchard hosts a 6th grade field trip for the local school and a few days before the kids come, they put an egg and potato inside the compost so when the kids arrive, they can see the egg is hard-boiled and then play hot-potato with the weird stinky potato!
When the compost has been turned a few times to allow the whole thing to cook, there will be only good bacteria and healthy, nutrient-rich compost.
WHAT TO COMPOST
No meat, dairy or animal products (bones, butter, fish skins) or pet waste
Nitrogen/ “Green”:
Fruits & veggies
Peels, skins & cores of fruits & veggies
Herbs & spices
Nutshells
Coffee Grounds
Egg shells
Pits & seeds
Grains & beans
Tea bags without the staples
Chemical-free hair
Chemical-free fingernails
Feathers from the down sofa or birds outside
Fresh house plant leaves
Store-bought flower bouquets (only for the city green bin if your goal is organic)
Carbon/ “Brown”:
Shredded brown paper bags
Paper egg cartons
Toilet paper rolls
Brown, dry leaves (you can get them from parks sometimes, ideally they’d be from a pesticide-free yard)
Vacuum cleaner or sweeping dust
Ash from a firepit that used wood
Dry house plant leaves
Wood chips (ideally chemical-free/ non-treated)
COLLECT THE COMPOST
Collect your food scraps in the freezer or fridge, so they don’t smell or attract bugs. You can keep them in glass or plastic tupperware, or you have regular plastic bags, you can use those and wash them out and re-use them. Or use compostable bags. Or to create less waste, you can keep them in a bowl with no lid or a brown paper bag that can be tossed in to the compost.
You can also collect scraps in a smell-absorbing compost bucket on your counter-top. (We use this one. During the summer ant-parades, we keep it in the fridge.)
WHERE TO COMPOST
When you’re ready to compost, put your food scraps and brown compostable waste in:
your yard in a compost pile above ground
a pit in the ground with or without doors to seal it
a fenced in compost area
a plastic compost bin that turns
a wooden compost bin that allows for air circulation
a homemade compost trashcan with holes drilled in the sides
It seems like it’s possible that everyone can participate in some part of the compost cycle. But getting started may be difficult without seeing the magic in action. In my experience, composting can a passionate team sport or an invigorating ice-skating solo. Reading about it may be all you need to start on your own, but it can also be helpful to find some experienced folks who will let you watch their process or answer questions about how they do it. You could also find a free class or offer to temporarily help a community garden with their compost. I learn so much by helping flip the pile every so often at our beloved Hollywood Orchard.
If you want to do it in a group, there may be compost hubs or compost co-ops near you that you can join.
Whether working with others or solo, I suggest trying to get comfy with the idea that trial and error is part of the process no matter what, and it can be exciting and beautiful.
For folks in Los Angeles:
The City gives some free workshops and discounted compost bins and worm bins.
Kiss the Ground also has free compost workshops sometimes, listed on their FB page.
The Burbank Recycle Center has a free compost workshop the last Wednesday of every month from 6-8pm from March – November, you just have to RSVP.
The Hollywood Orchard in Beachwood Canyon offers opportunities to work on their compost pile where the compost-curious can learn via hand-on practice. Join the Hollywood Orchard mailing list and ask to be informed of when we get together to work on our compost pile, then come play in the dirt with us!
Whenever you’d like. Composting can seem tricky, but I feel like you’ll know when you’re ready. To me, love is the main ingredient. Add some to the compost, and some to yourself. It lets you keep trying until you figure out what works for you.
These are true for any compost, whether it’s done in a bin, in a pile, or in the ground. (There are more tips later specific to bins and piles.)
Compost needs about 50% green ingredients, 50% brown ingredients, and oxygen.
“Green” is anything with moisture. It can be any color. Food scraps, grass, leaves, coffee grounds, (non-pet) manure…
“Brown” is anything dry. Dry leaves, brown paper bags, wood chips, egg cartons…
Green is nitrogen-rich.
Brown is carbon-rich.
The compost needs oxygen to work. That’s why it’s important to turn bins or flip piles when making compost, to let oxygen get to different parts of the compost.
If there is too much green, it will get very stinky. If this is happening, add more brown. (Also, too much green means too much nitrogen, which means it could burn plants if it was used as fertilizer in this stinky form.)
No meat, dairy, fish, or animal food oils can go in the compost, unless it’s bokashi (see below).
Pet waste is bad because sometimes it has bacteria that can survive the heat of the pile.
It helps to cover the compost at the end with a layer of only brown in order to keep the smell enclosed.
Whatever size the compost starts out, it will end up being much smaller when it’s done. (Sort of like cooking fresh spinach)
If you’re trying to make organic compost, make sure yard trimmings you use (fresh grass, brown leaves, etc) come from a yard that doesn’t use pesticides.
We chop up twigs and branches with shears before adding them to the compost. Making everything into smaller pieces helps the compost digest more quickly and easily, like chewing for our tummies.
COMPOST COOKS INTO CLEANLINESS
A few years ago, a farmer friend of mine taught me that compost piles get hot and they are actually cooking the carbon-rich brown & nitrogen-rich green scraps. They get so hot, about 140 degrees, that the creatures one might worry about staying inside the pile (bad bacteria, bugs and any rodents who might smell tasty treats inside the pile) can’t live there anymore. It’s too hot so they leave. Pretty cool, huh? (Pun inaccurate and not intended.) A pile covered in winter snow will still cook inside and sometimes steam will still rise off of the covering snow! When it’s done, there will be only good bacteria and healthy, nutrient-rich compost.
WHY TO COMPOST
Composting food scraps and brown waste returns back to the earth what came from the earth and lets it become nutrient-rich soil that grows more plants, instead of landfill trash that becomes methane gas.
Also, when compost is added to a garden, it amends the soil by nourishing it. As the soil gets richer, plants in healthy bacteria-rich soil don’t need pesticides or chemical fertilizers. They can be next to plants with disease and not get sick. It’s like our human immune systems: we need good bacteria (probiotics) and nutrients and minerals for our organs to fight off disease. Plants are the same way. And the same way that we have to keep eating those things, so do the plants.
Helping the plants immune system ends up helping ours too. The garden food ends up having more nutrients and tasting better too 🙂
Plus plants in healthy soil need less water, which saves water! It also reduces the city’s need to collect yard waste, saving resources.
Even if you don’t have a garden, putting compost back into the earth anywhere is healing for it, from the lack of methane gas to the gain of nutrients. Overall, it’s a cycle that benefits people, the plants and the planet.
WHAT TO COMPOST
Fruits & veggies
Peels, skins & cores of fruits & veggies
Herbs & spices
Nutshells
Coffee Grounds
Egg shells
Pits & seeds
Grains & beans
Tea bags without the staples
Shredded brown paper bags, paper egg cartons, toilet paper rolls
Brown, dry leaves from our pesticide-free yard
Chemical-free hair
Chemical-free fingernails
Down feathers from the sofa or birds outside
Vacuum cleaner or sweeping dust (haven’t done this one yet, but want to!)
House plant leaves & cut flowers (for the green bin)
No meat, dairy or animal products (bones, butter, fish skins)
WHERE TO STORE FOOD SCRAPS
Store the food scraps you’re collecting in the freezer or fridge (so they don’t smell) until you’re ready to compost.
WHERE TO COMPOST
These are some options of how people compost. I’m sure there are more, but these are what I’ve heard. You can put your food scraps and brown compostable waste in:
your yard in a compost pile above ground
a pit in the ground with or without doors to seal it
a fenced in compost area
a plastic compost bin that turns
a wooden compost bin that allows for air circulation
a homemade compost trashcan with holes drilled in the sides
NO ROOM TO COMPOST? PUT YOUR FOOD SCRAPS IN…
the freezer or fridge (so they don’t smell) until you’re ready to do any of the following with them
your green or brown bin from the city
your outdoor or indoor worm bin (no acidic food or shells)
an indoor bokashi compost bucket (more info below)
or donate your food scraps to an community organization, farmer’s market or restaurant that accepts compost. L.A. Compost collects food scraps on Sundays at the Motor Avenue Farmers Market from 9 a.m. to 2 p.m. and the Atwater Village Farmers Market from 10 a.m. to 2 p.m
COMPOST INFO SPECIFIC TO BINS
Make sure you put in brown stuff. Just food and it gets stinky and won’t become compost.
Make sure it doesn’t get too heavy to turn. Turning gives it the oxygen it needs to work.
While water is added to open-air piles, the enclosed nature of bins seems to use the moisture of the green ingredients to help cook the compost, instead of needing water. But if things get too dry, try gently adding in some water when you go to turn the bin.
COMPOST INFO SPECIFIC TO PILES
This is info for composting not in a container, but in a large pile above ground:
One cubic yard is the magic size for the pile to really heat up.
LAYERING & WATERING
Make a layer of green, about half an inch thick, then a layer of brown, same thickness, alternating as you go, and gently watering the whole time.
Each time we make a double layer of green & brown ingredients, we mix them together with a pitch-forky hoe. (I’m sure that’s the proper name for it.) Then we make another set of layers and mix them and so on. Doing it slowly like this makes it be thoroughly mixed. It also lets the water get in there to hold it together like a glue so the pile can get really tall and reach its cubic yard goal.
Without watering each layer, it apparently doesn’t cook!
The water should be saturated to where you could wring the compost out like a sponge. But if it’s trickling down the sides, it’s too much.
FLIPPING OR TURNING THE PILE
We’ll go back and turn or flip the pile 3-4 more times before it’s done.
To “turn” the pile, have a second space as large as the one the compost is in where you can put the pile. (In the photo above, we moved it from the left space where the pitchfork is to the right.) I thought we would flip it in place, which seemed hard, messy and confusing. Putting it next to where it was, made it so easy to flip! That may seem obvious to some, but living in apartments for most of my life apparently has made my brain not think of space as an option. This blew my mind, ha!
The top layer will have cooked the least because it was exposed to the air.
The inside will be more cooked, even ashy sometimes, or still steaming!
When we flip the pile, the top layer becomes the bottom layer and the bottom becomes the top, so the whole thing will get a chance to cook evenly.
We shovel the top layer onto the empty spot and repeat the same watering/ mixing as we did for each layer before.
More new green or brown can be added in every time a pile is flipped.
A pile can be turned every three days to finish the project more quickly.
Turning it once a week is fine.
Turning it every 3 weeks or whenever is fine too, it’ll just take longer.
INGREDIENT TIPS
Horse poo really has a hard time breaking down. (Another gardening friend recently said that chicken poo or sheep poo work wonders! And cow poo, too, because their four stomachs break the food down more than a horse’s stomach does.)
If we see something that is stuck in a clump, we break it up with our hands.
The Hollywood Orchard (where we made this pile) doesn’t worry about avocado pits or too much acidic fruits. It’ll all break down eventually.
FREE PRACTICE
If you can find a free class or a place to go help someone do all of this with a pile, great! I learned so much from experiencing it in person.
In LA, the city gives some free workshops and discounted compost bins and worm bins. Kiss the Ground also has free compost workshops sometimes, listed on their FB page. You can also look up Grow Good, they give free classes from time to time. Here’s an LA Times article with more info.
March – November of 2018, the Burbank Recycle Center has a free compost workshop the last Wednesday of every month from 6-8pm, you just have to RSVP.
My favorite option of course is for people to join our beloved Hollywood Orchard mailing list, ask to be informed when we get together to work on our compost pile, and then come play in the dirt with us!
If you get to work with others, or you’re trying on your own, either way, let it be okay that trial and error is part of the exciting learning process!
My favorite compost video is of a guy in Hawaii who is playful and hilarious and simply shows a covered bucket and says, “This is BO-KAA-SHIEEE. It’s from Japan. It’s meat compost. Haven’t heard of it? It exists! That’s all I’m going to tell you. Look it up.” Ha!
So I did! And now I know that meat, dairy & animal oils can be composted too! And we can compost inside!
Bokashi bucket composting is a type of composting that takes two weeks to ferment food, including meat & dairy. All kitchen scraps go into an airtight bucket with bokashi, a mix of wheat bran, molasses, and specific microorganisms such as yeasts, actinomycetes, lactic acid bacteria and photosynthesis bacteria. The good bacteria breaks down the food and the lack of oxygen keeps the bad bacteria from growing. It’s essentially pickled compost. Or probiotic compost. Once the microbes in the bucket have made it safe, it’s added to soil or compost outside and soil microbes finish the process. Pretty neat!
Japan has done it for hundreds of years, but recently a professor clarified the exact ratio and type of microbes needed to make it safe, which allowed the practice to reach more people. For fellow curious friends, here is a site where bokashi microbes and buckets are for sale and this site has great frequently asked questions about bokashi.
WORM BINS
If you don’t have brown waste (dry leaves, brown paper bags, twigs etc) and you only have food scraps, your situation is perfect for a worm bin. The worms only need food scraps and are happy to help you on your composting quest.
WHY HAVE A WORM BIN?
After the worms eat food scraps, just their poo is left over and it’s called “worm castings”. It’s used to sprinkle on the soil around plants as a fertilizer!
In some worm bins, there is even a spout at the bottom to drain their “tea.” In this case, “tea” is pee. Just like their poo, it can be poured on the soil or sprayed on the leaves of plants- they love it!
“Worm tea” can also be made by putting a glob of poo in some water, letting it sit for a few hours and then feeding it to your plants as a wonder-working fertilizer.
Worm castings are filled with enzymes, good bacteria, and nutrients. Worm poo contains no salt, has a neutral PH of 7, and is water-soluble, so it is immediately absorbable by plants and can’t burn even the most delicate ones. Extreme PH levels, either high or low, make it impossible for plants to absorb nutrients and worm castings help prevent these extreme levels.
It contains nitrates, phosphorus, magnesium, manganese, potassium, iron, calcium, copper, zinc, cobalt, borax, carbon and nitrogen. The good bacteria in the worm guts ends up in the castings, continuing beneficial activity in the soil too. And a light oil is on the castings when they come out, which erodes over time, creating a time-release effect for the quickly-absorbable nutrients.
And don’t worry, there is surprisingly nothing gross about earthworm poo. You can stick your face right near it and inhale deeply and it smells lovely! It’s as clean and refreshing to us as it is healing for the plants.
WHICH WORM BIN DO I BUY?
The square worm bins often fall into themselves. I recommend buying the circular 3-tray Can-O-Worms. It used to be available on Amazon, but today I’m only finding it on GrowOrganic.com. If it’s not available at that link when you’re looking, just Google Can-O-Worms with the dashes (if not, lizard food comes up), and look for a black circular thing with 3 levels (each level has handles). Shorter ones with less levels are more available online, but the taller one will make it easier to harvest the worm castings. It’s usually about $120.
You can also make your own worm bin, but I’ll come back and write more about that another day.
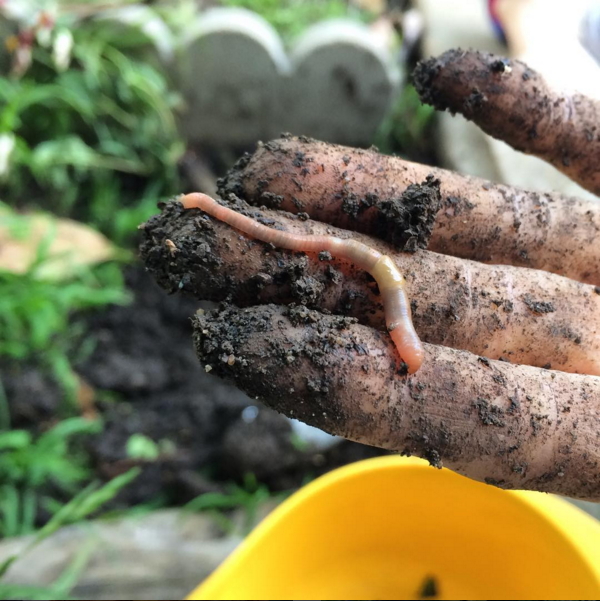
THE RIGHT KIND OF WORMS
There are actually different kinds of earthworms! Some are meant for worm bins and some aren’t. Red Wigglers are happy to eat food scraps because they are epigean, meaning they are found above ground, actively decaying rotting vegetables, compost and manure. (Anthills are epigean too, above ground. Fascinating. To me, at least.)
Other earthworms are meant to have humus and soil as their main food and won’t do well in a food scrap environment. And Red Wigglers won’t do well in soil when it dries out.
So be sure to put the right worms in your bin to keep them safe and happy. I think the worm below is not a Red Wiggler. It’s the kind likes soil. The Red Wigglers are much more red. But I’m not sure. So I buy Red Wigglers to be sure…
WHERE TO BUY WORMS
I buy them at the Orchard Supply Hardware (OSH) in Los Angeles. They have a little fridge of live things and the Red Wigglers come in a $15 container that looks like a pint of ice cream.
Farmers also sell them at markets or if you go directly to their nursery. Some people have businesses selling worms online. Or if you have a friend with a worm bin already, you can take a handful of them and over time, your bin will be full of worm families!
LEARNING THROUGH EXPERIENCES
For International Compost Awareness Week in May, Rosario Dawson, Amy Smart, Adrian Grenier, Kendrick Sampson, Paul Blackthorne, & Kiss the Ground (a non-profit in LA) worked together to get the word out about how composting restores the cycle of life.
They had a Compost Challenge with daily challenges, but the big one was to post a short video or photo sharing your Compost Story, what you do with your left over food scraps.
Fellow soil lovers shared their Compost Stories with Kiss the Ground on social media and it let me see how there are so many different ways to do it and how I can make it easier for myself. It was very helpful and inspiring to hear, and see, other people’s ways of composting!
I recommend searching the hashtag #compostlife or @kissthegroundca on Facebook, Twitter, and Instagram to hear more ideas. Here is my compost story:
MY COMPOST STORY PART 1 | THE HOLLYWOOD ORCHARD PILE
May 10, 2017 I’ve been participating in making and flipping the Hollywood Orchard compost pile over the past few months. From this experience, I’m getting to learn even more fun things about composting! The Hollywood Orchard made a big compost pile this morning! (It’s even taller in the shadows.) This particular day, the pile was a mix of:
local rabbit poo
local horse poo
fruit & veggie fiber remains from a juicery
straw
clipped up loquat tree trimmings
dry leaves from a yard
We make thin repeating layers of these ingredients, each layer gently watered the whole time.
The pile will get hot even by tomorrow! We are prepping for when the Cheremoya school kids to come visit the Orchard in Beachwood Canyon in two days. We’ll put a potato and deep in the pile tonight to cook & show them how hot it gets inside! And randomly, all of this happens to coincide with International Compost Awareness Week! #hotpotato
MY COMPOST STORY PART 2 | OUR BIN
May 11, 2017 This is Shane & I’s homemade compost bin! A trash can with drilled holes in it. We’ve had it for years, but as it filled, it was too heavy to rotate (aka roll around on the driveway)! And then we stopped adding brown stuff, so… whew! It is an intense/ rich/ thick pile of wet stuff. At the beginning of April, we started adding brown again though. But it’s still hard to truly mix the brown in to the bottom of the muck.
So we’re saving carbon-rich brown yard leaves, torn-up brown paper grocery bags, egg cartons, & toilet paper rolls to eventually mix with this nitrogen-rich giant wad of old food we have in our compost can. We’re either going to mix it in a fancy compost bin that we can turn easily, or build a pit topped with a raised-garden-bed-type box with cellar doors to keep out critters, or just find a spot to make a pile in the open, now that we saw how to do it at the Hollywood Orchard. Whatever we decide to do, our layers of carbon & nitrogen will be ready and abundant!
But in the meantime, we made our own worm bin! Worms don’t need brown carbon like compost does, and since we naturally have more food scraps (which fall under “green”), a worm bin makes sense for us.
Also, we used to only compost foods that are organic and other things that are chemical and pesticide free. But because of The Compost Challenge, we realized we were just throwing non-organic food in the trash and wasting it! So now we’re also starting to put non-organic food in our green bin to be composted by the city.
We keep our food scraps in our refrigerator before transferring them to the compost to avoid smells or a parade of ants. We need to get better tupperware for the fridge door to keep it all easily accessible and organized (Organic/ Non-organic/ Worm Bin). We also need to find inside-the-house storage for our new habit of keeping brown paper things for the compost.
We keep the most chopped up, less acidic and soft organic food in a separate tupperware for the worms. They like it.
As for non-food items, we’ve worked up to having all natural, basically edible, shampoo, conditioner and hair gel so that we can compost our hair with our organic compost. Hair is incredibly nitrogen-rich! So are our fingernails! So I don’t use any nail polish or nail polish remover and our body soap is also all-natural ingredients. So we can organic-compost our fingernails too! Fun fact: There are companies who even make hair-mats that cover the base of plants to keep moisture in and add nutrients!
I’m madly in love with the fact that what our body exhales (carbon dioxide) and sheds (nitrogen in the form of hair and nails) naturally feeds the plants and trees around us, and what the plants and trees exhale (oxygen) and shed (fruits & veggies) naturally feed us. How magical. (I even love mites- because they are eating our dead skin!) Imagining a world without this cycle of togetherness leaves me thinking of gross piles of hair and fingernails with no where to go! But in reality, the cycle we have is amazing! I technically have no excess, because it all has a place that helps the world in some way… Even the “gross” stuff becomes beautiful!
KISS THE GROUND’S RESOURCES
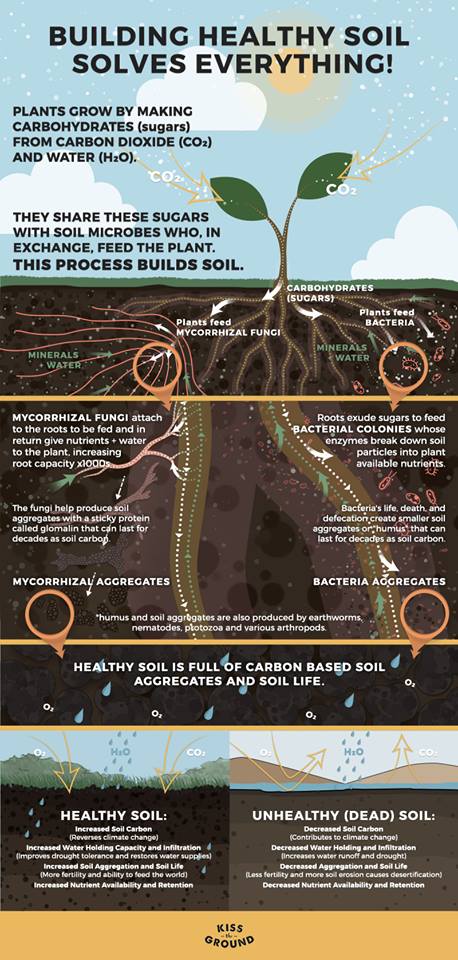
Kiss the Ground made this deliciously passionate video about how to keep our soil healthy with compost and how when carbon is in the air, it’s bad, but in the ground, it nourishes life:
They also shared about the intricacies of what the soil is doing:
Their Compost Story video below also extends into the details of why composting is important. Many school teachers shared it with their classes during the Compost Challenge. I thought that was so cool! Kiss the ground also has a lot of other wonderful composting posters, tools, and content on thecompoststory.com & kisstheground.com.
One last helpful summary of How to Compost, made by Kiss the Ground…
Thanks for listening. I would love to hear your compost story if you feel like sharing!