If you want to compost, but you don’t have brown waste (dry leaves, brown paper bags, twigs etc) and you only have food scraps, your situation is perfect for a worm bin. The worms only need food scraps, a bit of bedding and regular dampness, and then they are happy to help you on your composting quest.
WHY TO COMPOST WITH WORMS
After the worms eat food scraps, just their poo is left over and it’s called “worm castings”. It’s used to sprinkle on the soil around plants as a fertilizer!
In some worm bins, there is even a spout at the bottom to drain their “tea.” In this case, “tea” is pee. Just like their poo, it can be poured on the soil or sprayed on the leaves of plants- they love it!
“Worm tea” can also be made by putting a glob of poo in some water, letting it sit for a few hours and then feeding it to your plants as a wonder-working fertilizer.
Worm castings are filled with enzymes, good bacteria, and nutrients. Worm poo contains no salt, has a neutral PH of 7, and is water-soluble, so it is immediately absorbable by plants. Extreme PH levels, either high or low, make it impossible for plants to absorb nutrients and worm castings help prevent these extreme levels. The neutral PH also means castings can’t burn even the most delicate of plants. (Except orchids- Orchids naturally grow on the bark of rainforest trees or out of fallen leaves on the jungle floor, not in soil. I’ve found that giving them something found in soil can kill them!)
Worm castings contain nitrates, phosphorus, magnesium, manganese, potassium, iron, calcium, copper, zinc, cobalt, borax, carbon and nitrogen. The good bacteria in the worm guts ends up in the castings, continuing beneficial activity in the soil too. And a light oil is on the castings when they come out, which erodes over time, creating a time-release effect for the quickly-absorbable nutrients.
And don’t worry, there is surprisingly nothing gross about earthworm poo. You can stick your face right near it and inhale deeply and it smells lovely! It’s as clean and refreshing to us as it is healing for the plants.
WHICH WORM BIN TO BUY
The square worm bins often fall into themselves. I recommend buying the circular 3-tray Can-O-Worms. It used to be available on Amazon, but today I’m only finding it on GrowOrganic.com. If it’s not available at that link when you’re looking, just Google Can-O-Worms with the dashes (if not, lizard food comes up), and look for a black circular thing with 3 levels (each level has handles). Shorter ones with less levels are more available online, but the taller one will make it easier to harvest the worm castings. It’s usually about $120.
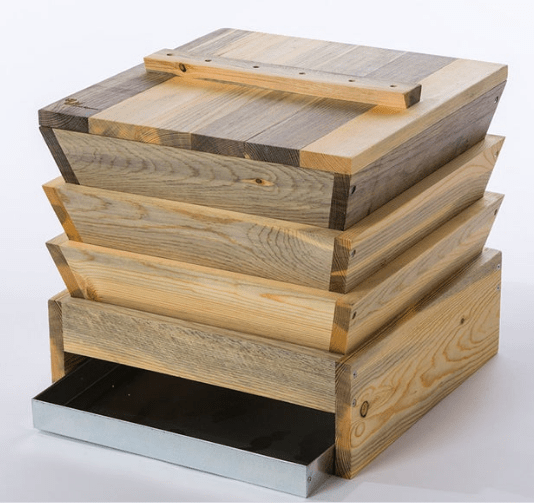
And I found one on Etsy that would look gorgeous inside in a kitchen! For a little apartment, or for anyone who doesn’t want to go far to deposit scraps or just wants to keep their crawling friends close by, this Pine 3 Bin Worm Composter (pictured above) seems like a great option to me. If it’s too expensive, you might want to search Etsy, it seems other people have followed in this carpenter’s footsteps for cheaper!
You can also make your own worm bin! That’s what I did. I used 3 stacking plastic tray bins made for papers / office things, and drilled holes in the bases and the lids, added a mesh hole to the top for air, and put an aluminum tray underneath to catch liquid. I made three of them and put them outside in pretty wooden crates on a shelf under a shady tree. The worms seem to like their home! I hope to share more details in another blog.
For now, here is the trusty Can-O-Worms:

THE RIGHT KIND OF WORMS
There are actually different kinds of earthworms! Some are meant for worm bins and some aren’t. Red Wigglers are happy to eat food scraps because they are epigean, meaning they are found above ground, actively decaying rotting vegetables, compost and manure. (Anthills are epigean too, above ground. Fascinating. To me, at least.)
Other earthworms are meant to have humus and soil as their main food and won’t do well in a food scrap environment. And Red Wigglers won’t do well in soil when it dries out.
So be sure to put the right worms in your bin to keep them safe and happy. I think the worm below is not a Red Wiggler. It’s the kind likes soil. The Red Wigglers are much more red. But I’m not sure. So I buy Red Wigglers to be sure…

WHERE TO BUY WORMS
I used to buy them at the Orchard Supply Hardware (OSH) in Los Angeles before they closed. They had a little fridge of live things and the Red Wigglers come in a $15 container that looks like a pint of ice cream. The Sunset Nursery on Fountain has this little fridge too. But now, I order them from Uncle Jim’s Worm Farm and they come alive in a bag in a box in the mail!
Farmers also sell them at markets or if you go directly to their nursery. Some people have businesses selling worms online. Or if you have a friend with a worm bin already, you can take a handful of them and over time, your bin will be full of worm families!
HOW TO CARE FOR THE WORMS
You’ll need brown paper bags/ or coconut coir/ or cardboard, water, a spray bottle, food scraps, a bin and worms.


Get some brown paper bags and rip them into thin strips, or order a brick of coconut coir from Uncle Jim’s Worm Farm. Then soak the strips or the brick in water for a day. Now you have worm bedding! The worms can also eat this bedding if the food isn’t replenished in time. Pretty cool trick- eating your house/ sleeping in your food.
 Worms like a damp environment for their skin, but not wet. The bedding needs to be like a wrung-out sponge. Spray water on the bedding once a week, or more, or less, depending on how dry your climate is and how close the bin is to sunlight. We try to use rainwater if possible, or let the water sit out for a day to evaporate the chlorine.

We’re in sunny LA, but our bins are under a very shady tree so we barely have to water the worms at all. When we only had two trays in the bin stack, instead of three, we had to water regularly.

Side sun note: Worms don’t like the sun- at all. It scares them and they often go as fast as they can back into the dark soil. Think of having their sweet skin and how bad a sunburn would feel. I also think light makes them feel like they are exposed to getting eaten by a bird. Nobody wants anxiety, even worms…
So if you have a clear plastic bin, cover it with a cloth or creatively find a way to make the outside dark. But having a clear bin also makes sure the worms make their home in the center of the bin and that they stay. So some people keep it clear. I think you can decide which works for you based on the size of the bin and amount of worms you have. Back to bedding…

Put the bedding in the lowest layer of your bin, not all the way to the top, but close. Put the worms under the bedding. They’ll crawl up out of the lowest layer through the holes in the bottom of the 2nd layer and eat. But they need to be close enough to reach. After eating, they go “home” to the bedding of the lowest layer.
Put the food scraps in the 2nd layer under some bedding too. They like privacy when they eat, and in general. Only put small bits of food in at a time and when you see they’re eating it, then add more. Over-feeding can kill them. As time passes and the 2nd layer is filled, only put food in the 3rd layer.
Overtime, there will be castings that are ready in the 1st layer. You can scoop them out and use them and move the lowest layer to the top. If the timing is right, most of the worms will have moved away from the castings and will be closer to the food. (If not, you’ll have to pick out some worms, especially if you’re making tea, so they don’t drown.) I usually just use small handfuls of castings and keep the layers in the same place.
This layers idea helps me understand what’s happening inside the bin, but I don’t stick to it in any way. I just sort of put food in a corner under some wet cardboard whenever and sense when to do it again. I’m still learning the rhythm of the worms, and myself, and the dryness of each season, even after years! And yet, there still ends up being a bit of fertilizer at the end of it all.
WORM FOOD
Worms like rotting food. If you put fresh food scraps in, they won’t eat until some time passes. Never give them acidic food or food that will make too much water. I’ve had a hard time when giving them melons- lost of bunch of worm babies this way!
If you want the process to go faster, chop the food into smaller pieces or blend everything in a blender before giving it to the worms. They like soft food, although some people do give them eggshells.
I’ve seen people bake the eggshells first to clean off any salmonella. I don’t do that, but also my worms don’t seem to like eggshells at all. I think it’s more that the shells take forever for the worms to break down, so I end up with finished castings mixed with eggshells. But I’ve also seen people powder the eggshells in a food-processor first and I think that could help me.
They basically eat like fat-free, raw vegans. They help me remember- if I don’t have any scraps to feed them, I’m probably not feeding myself very well. They can eat cooked food, but nothing processed and nothing with oil. For example, the tail of a boiled beet is great because it wasn’t cooked with oil, but canned beets are processed and often have vinegar which is too intense for worms. Because their skin is tender, they don’t like salty, hot, vinegary or spicy things.
A rule could be: “Don’t give them anything I wouldn’t want in my eye or an open wound.” I didn’t think this could get grosser, but I did it! Also, I guess I wouldn’t want most foods in my eye, especially eggshells… or cardboard… which isn’t a food… Nonetheless, here are our family’s worm food guidelines:
YES, IT’S WORM FOOD:
- soft or chopped up raw or boiled/ baked foods (preferably organic)
- non-acidic fruits
- veggies
- moderate grain & potatoes
- water-soaked and wrung-out egg cartons, shredded paper, cardboard, brown bags
- crushed or powdered eggshells


NOT A WORM FOOD:
- meat
- fish
- bones
- fat/ oil/ greasy stuff
- vinegar
- dairy
- eggs
- onion
- garlic
- spicy foods (peppers)
- salt or salty foods
- canned sauces
- nut butters
- processed food
- citrus (lemons, oranges, limes, pineapples, juice)
- anything acidic (bits of tomato are okay)
- animal feces
- grass
- fruit or avocado pits (take too long to break down)
- chemically treated wood
- bleached white paper
- herbicides and pesticides
- diseased plants
WORDS OF WORMSDOM
What has helped me to care for the worms is what I learned from the garden- some of the living things I care for will die. Whew, that’s a deeply hard thing for me to type. But I’ve learned from going into gardening and then caring for worms that the best mindset for me is to see the whole thing as practice and to expect things to die and to start again. It doesn’t make it easier when things die, but if I don’t think this way, I never start.
I love worms so very much. They remind me that, left as is, life has a cycle that can leave me feeling cared for without me having to try so hard and what seems like something negative can become nourishing again.

P.S. More food tips at Uncle Jim’s Worm Farm
